
Overview
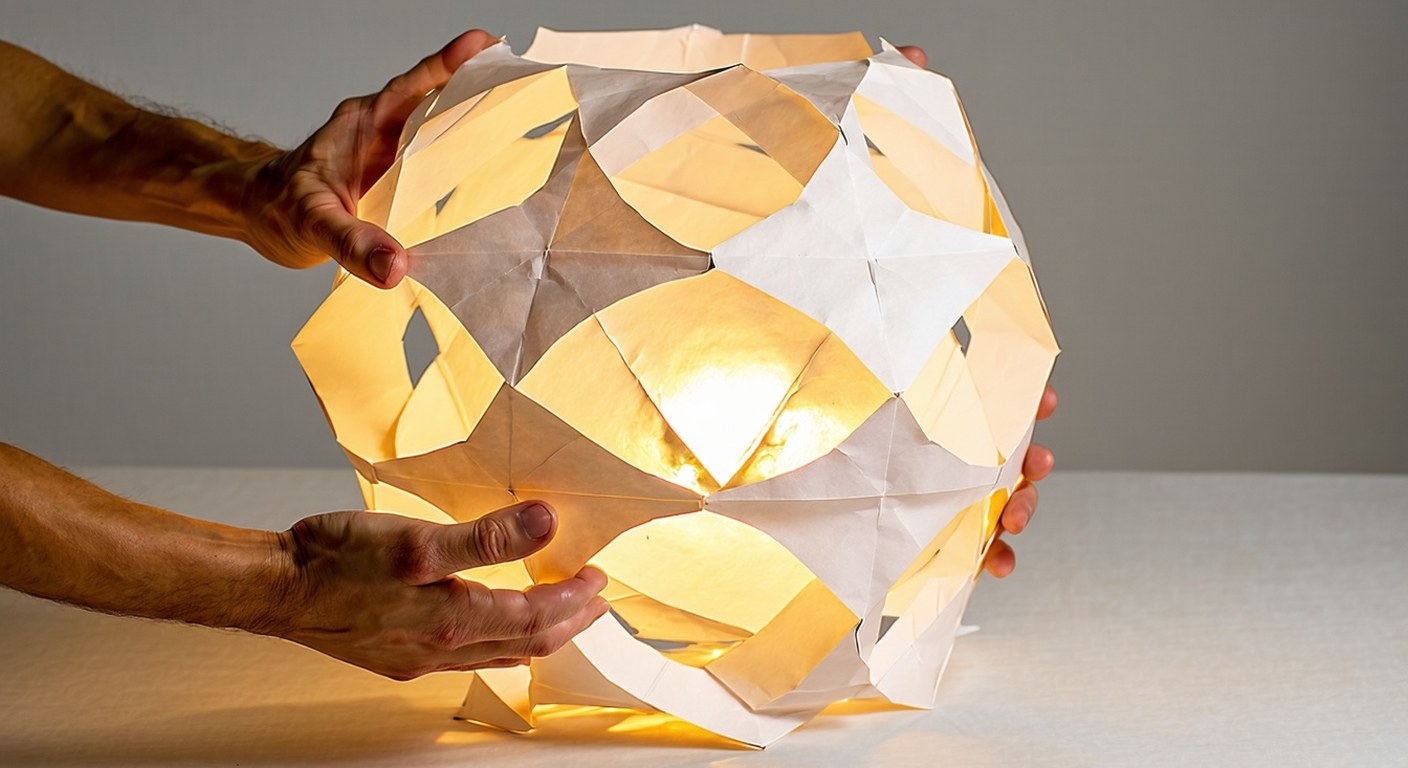
Create an illuminated paper lantern using modular origami techniques and interlocking panels—no glue required. This project results in a geometric, sculptural lantern that casts ambient light, ideal for decorative display. The lantern is constructed from heavyweight acid-free paper in warm neutral tones, accented with metallic gold or copper for visual interest. The finished piece stands about 12 inches tall and 8 inches in diameter, making it a striking centerpiece or accent for your home or studio. This tutorial is best suited for those with some experience in paper folding who want to explore modular construction and geometric design in functional art.
Learning Objectives
- Apply modular origami principles to build a three-dimensional structure without adhesives.
- Develop accuracy in measuring, cutting, and folding heavyweight paper.
- Fold uniform panels with interlocking tabs for secure assembly.
- Arrange geometric patterns and align surfaces for a cohesive 3D form.
- Combine artistic design with practical function in a handmade lantern.
Project Design
The lantern consists of 20 identical origami panels, each folded from a 6-inch (15 cm) square of heavyweight paper. Use 16 squares in warm neutral shades (such as cream, tan, or light brown) and 4 squares in metallic gold or copper for accent. Each panel is folded to include tabs and slots, allowing them to interlock and form a faceted, globe-like structure. The panels are arranged in a repeating geometric pattern, with metallic accents distributed for balance. The finished lantern is designed to house a battery-powered LED tealight for safe illumination.
Materials
- Heavyweight acid-free paper (80–100 lb / 216–270 gsm) in warm neutrals – 16 sheets, 6 × 6 in (15 × 15 cm) each
- Metallic gold or copper paper, same weight – 4 sheets, 6 × 6 in (15 × 15 cm) each
- Cutting mat (self-healing, at least A4 or letter size)
- Sharp craft knife (with replaceable blade) or precision scissors
- Metal ruler (12 in / 30 cm or longer)
- Pencil (for light marking)
- Battery-operated LED tealight candle
Alternatives: If metallic paper is unavailable, substitute with metallic origami or quality wrapping paper. For children, precut squares and use scissors under supervision.
Time, Skill Level, and Workspace
- Estimated Time: 4 hours (including folding, assembly, and finishing)
- Skill Level: Intermediate – requires careful folding and assembly
- Workspace: Use a clean, well-lit table with a cutting mat and organized materials. Handle sharp tools with care and supervise young participants.
Process Overview
- Cut paper sheets into uniform squares and score folding lines.
- Fold each square into origami panels with interlocking tabs.
- Prepare metallic accent panels by folding and mixing with neutrals.
- Assemble the panels by interlocking tabs to form a 3D lantern.
- Insert an LED tealight and display the illuminated lantern.
Step-by-Step Instructions
- Set up your workspace. Lay out your cutting mat, gather all tools and materials, and sort your paper by color.
- Cut paper squares. Using the metal ruler and craft knife, cut 16 neutral and 4 metallic squares, each measuring 6 × 6 inches (15 × 15 cm). Mark measurements lightly with pencil for accuracy.
- Score folding lines. For each square, use the ruler and a blunt tool (such as a bone folder or the back of your craft knife) to score horizontal, vertical, and diagonal lines. This will help achieve crisp folds.
- Make base folds. Fold each square in half horizontally, vertically, and along both diagonals, creasing sharply. Unfold after each crease to keep the paper flexible.
- Collapse into a base shape. Bring opposite corners together along the diagonal creases to form a flat, four-pointed star shape.
- Create tabs. Fold two adjacent edges inward by about 5/8 inch (1.5 cm) to form tabs. Flip the panel and repeat on the other two edges. Ensure all folds are sharp and consistent.
- Cut slots. With the panel flat, use the craft knife to cut a 5/8 inch (1.5 cm) slit at the center of each tab, perpendicular to the edge. These slots will receive the tabs from other panels.
- Repeat for all panels. Complete steps 4–7 for all 20 squares, keeping metallic and neutral panels separate for pattern planning.
- Arrange your pattern. Lay out the panels in your desired color arrangement, distributing metallic accents evenly among the neutrals.
- Start assembly. Take two panels and slide the tab of one into the slot of the other, aligning the edges so the panels meet at a clean angle. Press gently until secure.
- Add more panels. Continue interlocking tabs and slots, gradually building up the curved, faceted structure. Alternate metallic and neutral panels as planned.
- Shape the lantern. As the assembly grows, gently curve the structure to form a globe. Adjust angles to keep the lantern symmetrical and stable.
- Finish the form. The last panels will close the top and bottom. Carefully interlock the final tabs, tucking them inside for a seamless appearance.
- Check stability. Gently press around the lantern to ensure all tabs are fully inserted and the structure is rigid. Adjust any loose connections as needed.
- Insert the LED tealight. Open a small gap at the base if necessary, place the LED tealight inside, and close the gap by re-interlocking the tabs.
- Illuminate and display. Turn on the LED tealight, set the lantern upright, and enjoy the interplay of light and shadow through the geometric panels.
Visual Checkpoints
- After cutting: You should have 20 squares—16 neutral, 4 metallic—all the same size with clean edges.
- After folding and slotting: Each panel should be crisply folded with four tabs and precisely cut slots. Panels should lay flat with defined creases.
- After arranging: Panels are laid out in your chosen color pattern, with metallics evenly distributed.
- During assembly: The lantern takes on a rounded, faceted shape, with panels interlocked and holding their form without gaps.
- At completion: The lantern stands upright, illuminated from within, with geometric patterns and metallic accents reflecting the light.
Tips for Success
- Use a bone folder or the back of a spoon to sharpen creases for a professional finish.
- Test-fit two panels before assembling the entire lantern to ensure a snug fit.
- Keep hands clean and dry to avoid marking the paper, especially metallic surfaces.
- Arrange panels before assembly to confirm your color pattern and avoid last-minute changes.
- If a tab is too tight, carefully widen the slot with your craft knife in small increments.
Troubleshooting
- Panels won’t fit: Check that tabs and slots are the same size. Enlarge slots if too tight, or fold tabs slightly thicker if too loose.
- Paper tears at slots: Use a sharp blade and cut slowly. If a slot tears, reinforce the area with a small piece of clear tape on the inside.
- Lantern loses shape: Make sure all tabs are fully inserted and creases are sharp. Reinforce folds as needed.
- Color pattern appears uneven: Disassemble gently and rearrange panels before reassembling. Plan your layout visually before assembly.
- Pencil marks remain visible: Erase gently with a soft eraser before final assembly.
Safety Guidelines
- Always use a cutting mat to protect your work surface and prevent blade slips.
- Keep sharp tools out of reach of children unless closely supervised.
- Never use an open flame; only use LED tealights inside paper lanterns.
- Dispose of used blades safely in a sharps container.
- Work in a well-lit area to minimize mistakes and accidents.
Finishing and Care
- Display the lantern on a stable, flat surface away from moisture and direct sunlight to prevent warping or fading.
- Replace the LED tealight battery as needed. Remove the tealight before moving or storing the lantern.
- Dust gently with a soft, dry brush or compressed air. Do not use water or cleaning products.
- If the lantern becomes misshapen, gently reshape and reinforce folds as necessary.
- For indoor use only; keep away from pets and small children.
Cleanup and Storage
- Collect paper scraps and recycle or dispose of them responsibly.
- Clean and store tools safely out of reach of children.
- Store unused paper flat in a dry place to prevent curling.
- When storing the lantern, remove the LED tealight and place the lantern in a box with tissue paper to protect it from dust and crushing.
Variations and Further Exploration
- Experiment with different geometric panel shapes for varied lantern forms, such as pentagonal or hexagonal modules.
- Try translucent vellum or frosted paper for a softer, diffused light effect.
- Use larger or smaller panels to create lanterns of different sizes for grouped displays.
- Add hand-drawn or stenciled designs to panels before folding for a personalized touch.
- Explore colored LED tealights for dynamic lighting effects.