
Overview
This project guides you through creating a decorative stained glass panel that features layered, textured glass fused in a kiln and finished with cold-worked, polished edges. By combining colored and textured glass, you will produce a luminous panel that plays with depth, color, and light. The process involves careful glass selection and cutting, thoughtful layering, kiln fusing, and precise edge finishing. The completed panel is ideal for window display or as a backlit wall accent, highlighting the interplay of translucent blues, greens, amber, and subtle opalescent highlights.
Learning Objectives
- Identify and handle various types of sheet glass for visual and textural effects
- Develop safe and accurate glass cutting skills
- Master techniques for layering glass to enhance depth and color interplay
- Understand kiln fusing procedures and firing schedules
- Apply cold-working methods to grind and polish glass edges for a refined finish
- Balance color, texture, and light transmission in glass panel design
Project Plan
The finished panel measures 12 x 12 inches (30 x 30 cm) and is approximately 0.25 inches (6 mm) thick. The design should feature overlapping shapes and varied textures to create visual depth. Glass pieces are cut into geometric or organic forms, layered on a kiln shelf with firing paper, and fused to form a unified panel with subtle surface relief. After firing, the edges are ground and polished to a smooth, glossy finish, making the panel both safe to handle and visually striking. This piece is suitable for display in a window or as a backlit wall feature.
Materials
- Sheet glass (compatible for fusing) in translucent blue, green, amber, clear textures, and opalescent highlights (3–6 mm thick)
- Kiln shelf (at least 13 x 13 inches) and kiln wash or firing/kiln paper
- Glass cutter (oil-fed preferred)
- Running pliers and grozing pliers
- Electric glass grinder or glass polishing wheel with water coolant
- Fiberglass or cut-resistant gloves
- Eye protection goggles
- Permanent marker for marking glass
- Soft brush for cleaning glass
- Studio kiln with programmable controller
- Distilled water and soft cloth for cleaning
Tip: Fiber-based kiln paper can be used instead of kiln wash for easier cleanup. For edge finishing, diamond hand pads are a manual alternative to powered grinders, though they require more effort.
Time, Skill Level, and Setup
- Estimated Time: 2 days (6–8 hours total, including kiln firing and cold working)
- Skill Level: Intermediate (experience with glass cutting and basic kiln use recommended)
- Venue: Supervised professional glass studio
- Setup: Clean, flat worktable; access to a kiln; ventilated area for cold working with water supply
- Budget: $75–$150, depending on glass selection and studio fees
Visual Process Stages
- Selection and marking of raw colored and textured glass sheets
- Precise cutting and layering of glass pieces on a kiln shelf with firing paper
- Fused glass panel showing layered textures and slight surface relief after kiln firing
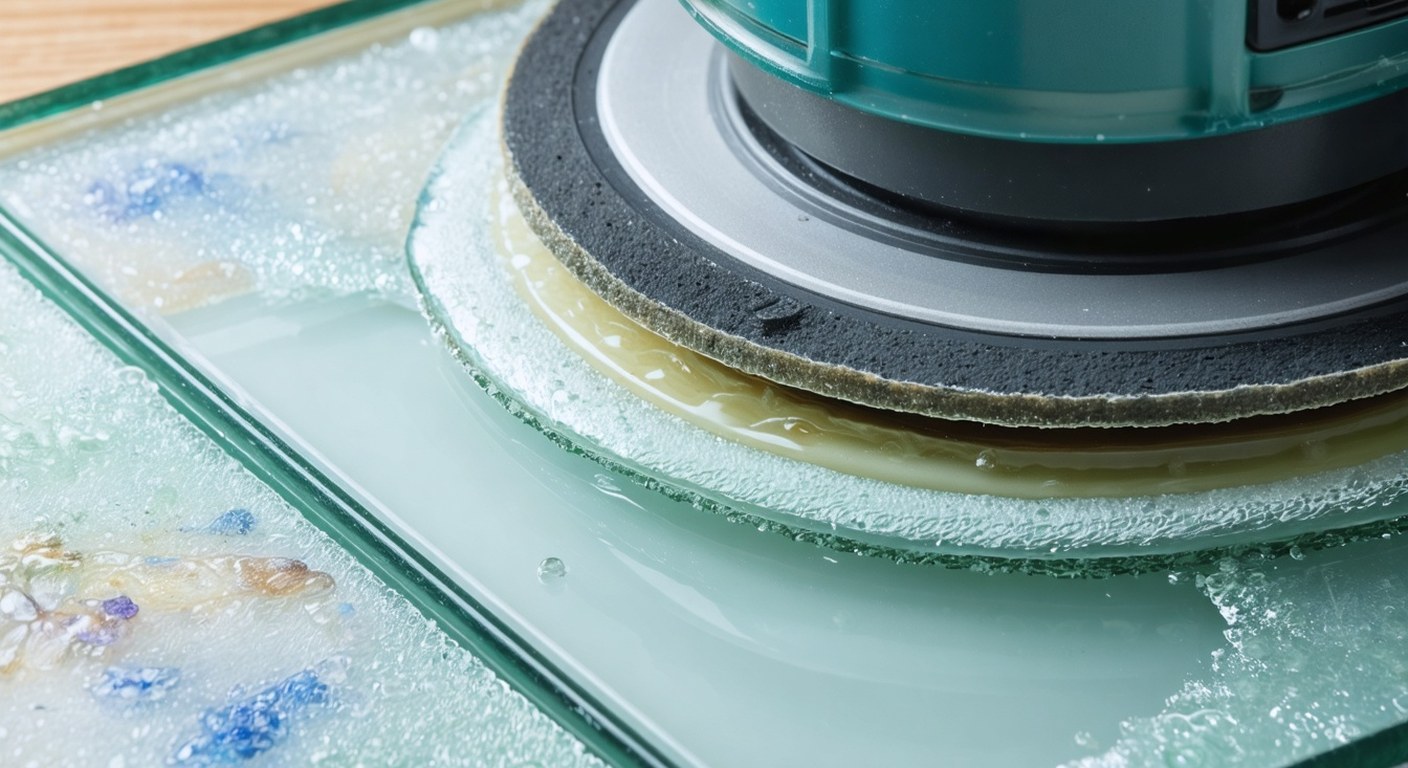
- Careful grinding and polishing of the panel's edges for a smooth finish
- Completed stained glass panel with vibrant, layered colors and polished edges, ready for display
Step-by-Step Instructions
- Prepare the workspace. Clear a stable, flat table. Lay out all tools and materials. Put on eye protection and cut-resistant gloves.
- Select and clean glass. Choose glass sheets in your chosen palette. Clean both sides with distilled water and a soft cloth to remove dust and oils.
- Design and mark the layout. Sketch your composition on paper, emphasizing overlapping shapes for depth. Place the sketch under the glass as a guide and mark cutting lines with a permanent marker.
- Cut the glass. Score along marked lines with a glass cutter. Snap pieces apart using running pliers. For curves or detailed shapes, use grozing pliers to refine edges.
- Dry fit the pieces. Arrange all cut glass on your worktable, layering as planned. Adjust for fit and visual balance, keeping the total thickness under 0.25 inches (6 mm).
- Prepare the kiln shelf. Apply kiln wash or place firing paper on the shelf, extending beyond the panel area to prevent sticking.
- Layer glass on the kiln shelf. Transfer your design onto the prepared shelf, building up from the bottom layer and ensuring all pieces fit within the intended panel boundaries.
- Check for gaps and overlaps. Inspect the arrangement for unwanted gaps or excessive overlaps. Adjust as needed; small gaps will soften during fusing, but large ones may remain open.
- Load the kiln and set the firing schedule. Place the shelf in the kiln. Program for a full fuse: ramp up at 500°F/hr (275°C/hr) to 1350°F (730°C), hold for 10–20 minutes, then anneal and cool slowly according to studio guidelines.
- Allow the kiln to cool fully. Do not open the kiln until it reaches room temperature (about 6–8 hours after firing) to prevent cracking.
- Remove and inspect the fused panel. Using gloves, lift the panel from the kiln shelf. Brush off any loose kiln paper and check for completeness and integrity.
- Mark and prepare for edge finishing. If the panel has spread during firing, mark the final 12 x 12 inch edges. Trim any excess with a glass saw or grinder if necessary.
- Grind the edges. Use an electric glass grinder with water coolant to smooth all four edges, removing sharpness and achieving straight, even lines. Work slowly and keep the glass wet to avoid chipping.
- Polish the edges. Switch to a finer grinding or polishing wheel, or use diamond hand pads with water, to achieve a glossy, transparent edge. Wipe away residue to monitor progress.
- Final cleaning. Rinse the panel with distilled water and dry with a lint-free cloth to remove any dust or particles.
- Inspect and prepare for display. Hold the panel up to light to check for uniformity in color, texture, and edge finish. Your panel is now ready for installation or display.
Visual Checkpoints
- After cutting: Glass pieces are cleanly cut, with minimal chipping, and fit your planned layout.
- After layering: The composition fits within the 12 x 12 inch area with no overhanging glass.
- After firing: The panel is unified, with subtle surface texture and no major cracks or bubbles.
- During edge grinding: Edges become smoother and more even, transitioning to a semi-glossy surface.
- After polishing: All edges are glossy, smooth, and safe to touch, enhancing the panel's luminous quality.
Tips for Success
- Preview your glass arrangement on a lightbox or in natural light to optimize color effects before fusing.
- Avoid stacking more than two layers in any area to ensure even fusing and prevent devitrification.
- Keep your glass cutter oiled and use steady pressure for clean scores.
- Label the back of each glass piece with a removable marker to maintain your design order during transfer.
- Add small compatible glass nuggets or stringers between layers for extra depth and interest.
Common Issues and Solutions
- Jagged or chipped edges after cutting: Smooth with a grinder before fusing, or position flaws away from the panel edge.
- Panel sticks to kiln shelf: Ensure thorough coverage with kiln wash or firing paper; if stuck, gently loosen with a plastic spatula after cooling.
- Large air bubbles: Reduce layering thickness and ensure close contact between pieces; slow down the firing schedule to allow air to escape.
- Cracks after firing: Let the kiln cool fully before opening and follow proper annealing schedules.
- Cloudy or dull edges after grinding: Progress through finer grits and polish thoroughly with water for a clear finish.
Safety Guidelines
- Always wear eye protection and cut-resistant gloves when working with glass.
- Operate grinders and polishers with water coolant to minimize airborne glass dust; never grind dry.
- Tie back long hair and avoid loose clothing in the studio.
- Follow all studio protocols for kiln use; never leave a kiln unattended while running.
- Dispose of glass shards in designated containers only.
- Wash hands thoroughly after handling glass or kiln paper.
Finishing, Display, and Care
- Display the panel in a window or against a light source to highlight color and texture.
- Use sturdy stands or secure hanging hardware; the panel weighs approximately 4.5–5.5 lbs (2–2.5 kg).
- Clean with a soft, damp cloth; avoid abrasive cleaners or rough sponges.
- Handle with care, even when edges are polished, to prevent chipping.
- For permanent installation, consult a professional for appropriate mounting hardware.
Cleanup and Storage
- Wipe down all tools and surfaces with a damp cloth to remove glass dust.
- Dispose of waste glass and used kiln paper according to studio safety procedures.
- Store unused sheet glass vertically in padded racks, sorted by color and texture.
- Clean and dry grinders and other equipment before storing to prevent rust.
- If not displaying immediately, keep the finished panel in a padded box for protection.
Project Variations
- Try different panel shapes, such as rectangles, circles, or freeform designs, for unique effects.
- Incorporate metallic leaf or dichroic glass for added shimmer and reflectivity.
- Experiment with partial fusing for more pronounced surface texture or stack thicker glass elements for relief.
- Use sandblasting or acid-etching (in a professional studio) to add surface patterns after fusing.
- Combine fused glass with traditional leaded or copper-foiled stained glass techniques for mixed-media pieces.