
Overview
Hand-pressed botanical relief tiles capture the intricate beauty of nature in a tactile, functional format. In this project, you will create a set of four small square tiles (approximately 10 x 10 x 1.2 cm, or 4 x 4 x 0.5 inches each) by impressing real leaves into natural clay. The process combines direct contact with organic materials and fundamental ceramic techniques, resulting in unique decorative coasters or art tiles. Whether displayed on a wooden stand or used as functional objects, these tiles celebrate the subtle textures and patterns found in the botanical world.
What You Will Learn
- How to prepare and evenly roll clay slabs for consistent thickness
- Techniques for transferring detailed leaf textures into clay without tearing or distortion
- Methods for cleanly cutting and refining the edges of soft clay tiles
- Best practices for drying, handling, and firing hand-built ceramics
- Creative approaches to organic surface design using found botanical elements
- How to finish and care for functional ceramic objects
Design Plan
You will create a set of four matching yet individually unique square tiles. Each tile will feature a relief impression of a different leaf or botanical specimen, highlighting the vein patterns and organic contours. The tiles will be made from natural terracotta or white earthenware clay, left unglazed for a raw, earthy finish or optionally glazed with a transparent matte glaze in soft earth tones. The final objects will be suitable for use as decorative coasters or as a tactile art display.
- Dimensions: Each tile approximately 10 x 10 x 1.2 cm (4 x 4 x 0.5 inches)
- Surface: Natural clay color, with crisp botanical relief
- Finish: Unglazed or transparent matte glazed
- Quantity: Set of four tiles
Materials & Safe Alternatives
- Clay: Natural terracotta or white earthenware clay (1.5–2 kg / 3–4 lbs)
- Leaves: Fresh or dried leaves with pronounced veins (e.g., oak, maple, fern, or herb sprigs). Avoid toxic or allergenic plants.
- Rolling tool: Wooden rolling pin or slab roller
- Cutting tool: Ceramic cutting wire or sharp clay knife (plastic knives are a safe alternative)
- Work surface: Canvas, plastic, or silicone mat to prevent sticking
- Sponge & water bowl: For smoothing and cleaning edges
- Optional: Transparent matte glaze (for a soft, functional finish)
- Studio kiln: For bisque and glaze firing (must be supervised by a ceramics professional)
Time, Difficulty & Setup
- Active working time: 3 hours (including preparation, pressing, cutting, and cleaning)
- Drying time: 24–48 hours (air drying before firing)
- Firing time: As per studio schedule (typically 1–2 kiln cycles)
- Skill level: Beginner to intermediate (no prior ceramics experience required, but attention to detail is important)
- Setup: Supervised professional ceramics studio with access to kiln and basic hand tools
- Budget: Low ($20–$50, depending on clay and glaze choice)
Visual Roadmap
- Raw lump of natural clay on a clean, prepared work surface
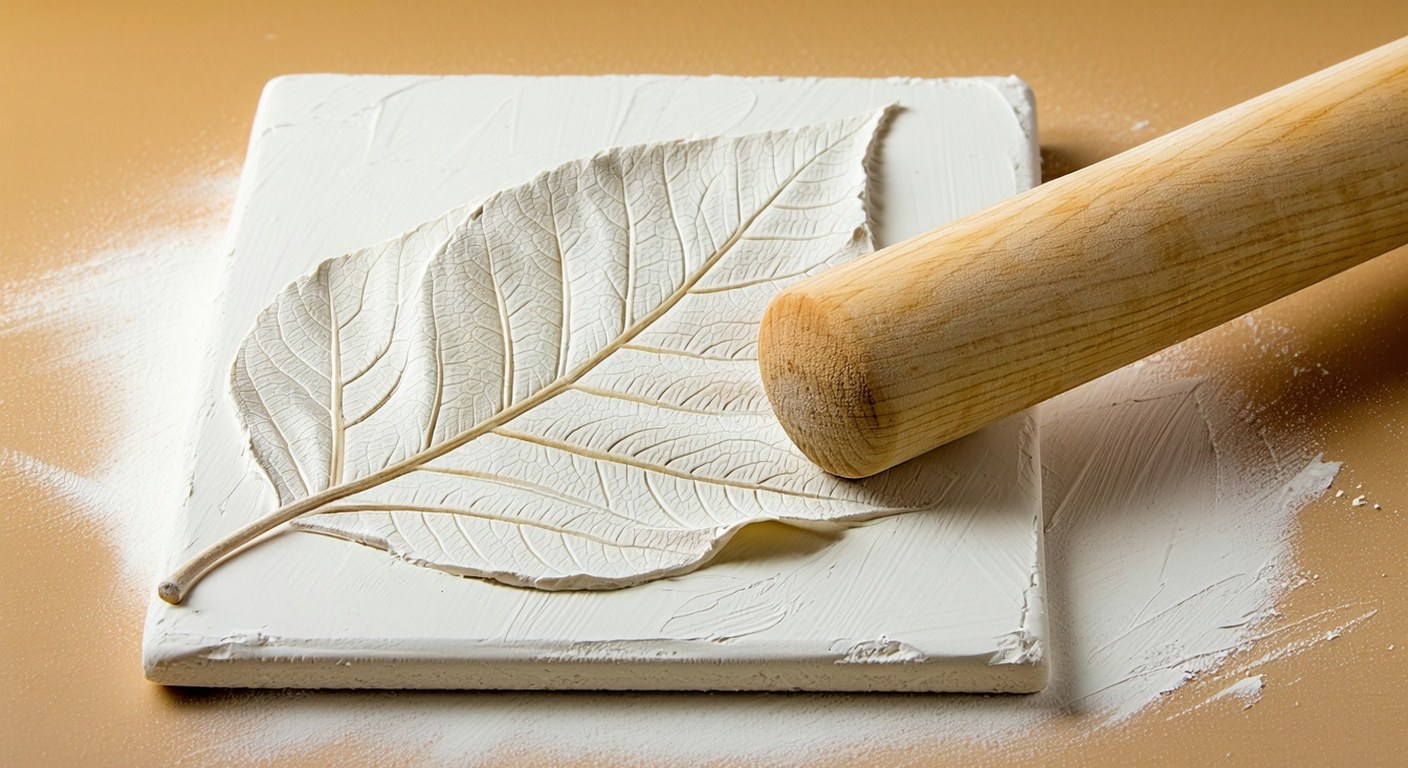
- Rolled flat clay slab with a leaf pressed firmly into the surface, revealing emerging vein textures
- Clay slab cut into perfect squares, each showing clear leaf impressions
- Tiles drying with edges carefully smoothed by a damp sponge
- Finished fired and optionally glazed tiles, displaying crisp botanical relief and natural clay color
Step-by-Step
- Prepare your work area by laying down a canvas, plastic, or silicone mat to prevent the clay from sticking and to facilitate easy cleanup.
- Portion the clay by cutting off about 400–500 g (14–18 oz) of clay for each tile; knead each piece to remove air bubbles and ensure uniform consistency.
- Roll the clay into a slab using a rolling pin or slab roller. Aim for an even thickness of about 1.2 cm (0.5 inches) across the entire slab. Rotate and lift the slab occasionally to prevent sticking.
- Select your leaves with well-defined veins and interesting shapes. Gently wipe them clean and pat dry if needed.
- Arrange a leaf on the clay slab with the veined side facing down onto the clay. Position it so the most textured surface will be pressed into the clay.
- Press the leaf into the clay by gently but firmly rolling over it with the rolling pin. Use steady, even pressure to transfer the texture without tearing the clay. The leaf veins should leave a clear, raised impression.
- Carefully peel away the leaf starting at one edge, pulling slowly to avoid tearing the clay or leaving debris behind. If any leaf bits remain, gently lift them with a needle tool or damp brush.
- Repeat the pressing process for each tile, using a fresh slab and a different leaf for variety.
- Mark and cut square tiles using a ruler and a ceramic cutting wire or knife. Measure and mark 10 x 10 cm (4 x 4 inch) squares on the slab, then cut straight edges for a clean, geometric look.
- Remove excess clay and gently lift each tile onto a drying board or bat. Use a flat, rigid support to prevent warping.
- Smooth the edges and corners with a damp sponge, rounding them slightly for comfort and to prevent chipping after firing.
- Allow the tiles to dry slowly to leather-hard stage (firm but not fully dry), covering loosely with plastic for the first 12–24 hours to prevent rapid drying and cracking.
- Check for flaws once leather-hard. Refine edges or surface details with a damp sponge or soft brush if needed.
- Once fully dry (bone dry, no coolness to the touch), arrange for bisque firing in a supervised kiln according to your studio’s schedule and clay type (typically to 950–1050°C / 1740–1920°F).
- Optional: Apply transparent matte glaze after bisque firing. Brush or dip a thin, even coat over the surface, avoiding the base if using as coasters. Allow to dry before glaze firing.
- Glaze fire the tiles according to glaze and clay specifications (typically 1040–1100°C / 1900–2010°F for earthenware). Allow to cool fully before handling.
Visual Checkpoints
- After rolling: Clay slab is smooth, even, and free of cracks, approximately 1.2 cm (0.5 inches) thick.
- After pressing: Leaf texture is clearly visible, with veins and edges sharply defined in the clay.
- After cutting: Squares are uniform, with clean, straight edges and centered botanical impressions.
- After smoothing: Edges and corners are rounded and free of burrs, surface remains undisturbed.
- After firing: Tiles are hard, durable, and display crisp relief; glazed surfaces are matte and even, unglazed surfaces show natural clay color.
Pro Tips
- Choose leaves with strong central veins and secondary vein patterns for the most dramatic relief.
- If clay sticks to the leaf, dust the leaf lightly with cornstarch before pressing.
- Roll from the center outward to avoid thinning the edges of your slab.
- Use a metal ruler as a guide for cutting perfectly straight tile edges.
- Dry tiles slowly and evenly to minimize warping—keep them covered loosely with plastic for the first day.
- If using glaze, test on a sample tile first to ensure it does not obscure fine details.
Common Mistakes & Fixes
- Clay slab too thin or uneven: Re-roll, using thickness guides or slats to maintain evenness.
- Leaf tears clay or sticks: Use less pressure, try a different leaf, or dust leaf with cornstarch.
- Tiles warp during drying: Flip tiles every 6–12 hours during drying, and dry on a flat, absorbent surface.
- Edges crack or chip: Smooth with a damp sponge while still soft; avoid over-wetting.
- Impressions are faint: Increase pressure when rolling, or select leaves with more pronounced veins.
Safety Notes
- Work in a supervised ceramics studio with proper ventilation and kiln safety protocols.
- Do not inhale clay dust; clean work surfaces with a damp sponge, not a dry brush.
- Use only food-safe glaze if tiles may contact food or drink.
- Handle sharp tools with care, always cut away from your body.
- Do not touch kiln or hot tiles until fully cooled; follow studio instructions for firing and handling.
Finishing, Display & Care
- Display tiles on a wooden stand, in a shadow box, or arranged as a wall grouping for tactile art appreciation.
- Use as decorative coasters; if glazed, they are water-resistant and easy to wipe clean.
- Clean with a soft, damp cloth; avoid abrasive cleaners that may scratch the relief.
- If unglazed, avoid prolonged contact with liquids to prevent staining.
- Store in a dry place, separated by soft cloth or felt to prevent chipping.
Cleanup & Storage
- Wipe all tools and surfaces with a damp sponge to prevent clay dust buildup.
- Store unused clay in an airtight container or plastic bag to keep it workable.
- Label and store your tiles on a flat board until fully dry and ready for firing.
- Clean sponges and brushes thoroughly and allow to air dry.
- Dispose of clay scraps in studio recycling bins, not down the drain.
Next Variations
- Experiment with different clay bodies (porcelain, stoneware) for varied color and texture.
- Try layering multiple leaves or botanical elements for complex relief patterns.
- Use colored slips or underglazes to highlight leaf impressions before firing.
- Combine tiles into a larger wall panel or mosaic for a striking installation piece.
- Press seeds, grasses, or flower petals for alternative organic textures.