Overview
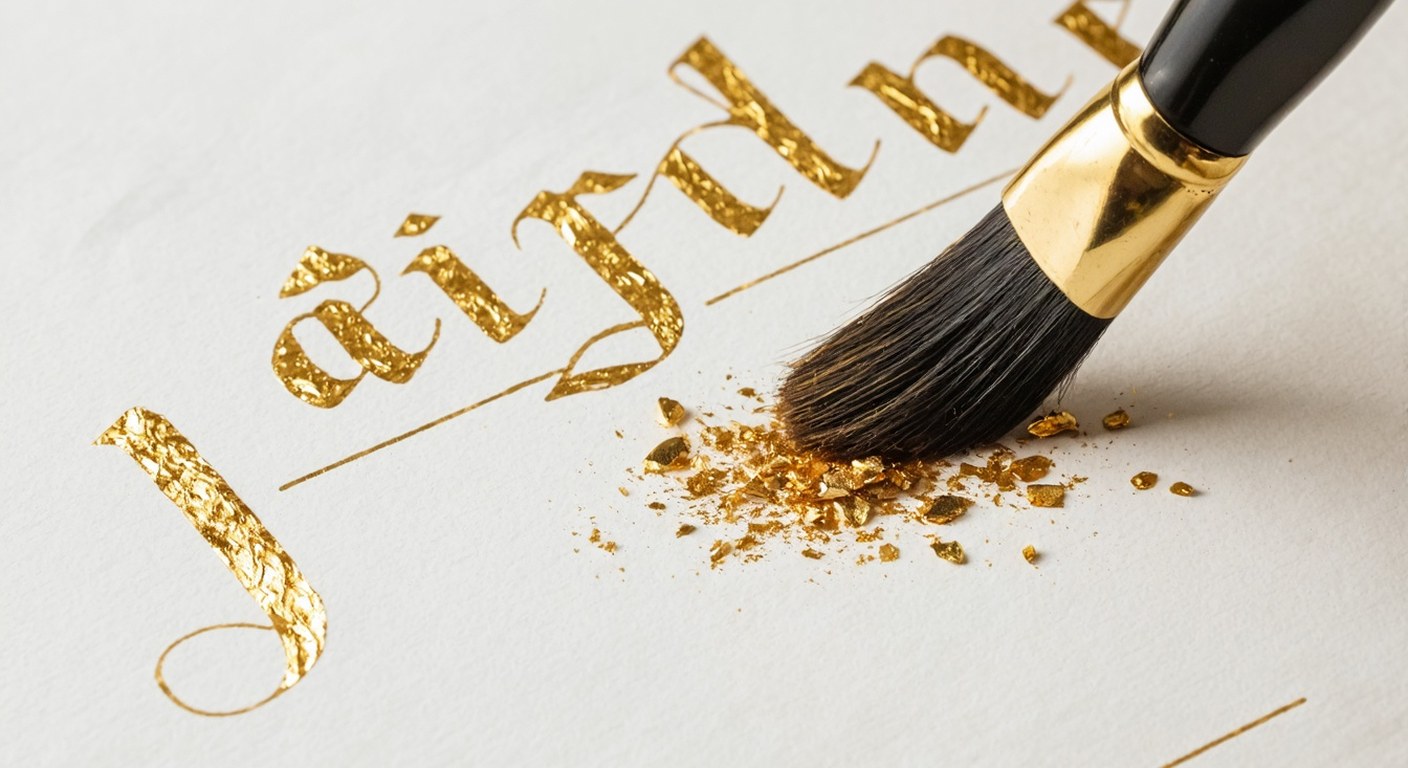
Creating gold leaf calligraphy on handmade cotton paper combines the expressive qualities of brush lettering with the luminous appeal of gilding. This project demonstrates how to craft a decorative calligraphy piece, measuring 11 x 14 inches (28 x 35.5 cm), using deep black ink and radiant gold leaf on textured, cream-toned cotton rag paper. The process highlights the tactile nature of handmade paper, the fluidity of brush calligraphy, and the precision required for applying gold leaf, resulting in a striking artwork ideal for display or portfolio inclusion.
Learning Objectives
- Choose and prepare handmade cotton rag paper for calligraphy and gilding
- Practice controlled brush calligraphy for clean, fluid letterforms
- Apply adhesive sizing accurately for gold leaf application
- Handle and apply gold leaf flakes delicately
- Balance decorative embellishments with legibility and composition
- Finish and display mixed media calligraphy artwork effectively
Project Design
The finished piece centers a calligraphy word or phrase in black ink, with selected downstrokes or flourishes highlighted in gold leaf. The natural cream tone and deckled edges of the handmade cotton rag paper enhance the visual texture and authenticity. Gold leaf is applied only to chosen areas, creating a dynamic contrast between matte ink and brilliant metallic accents. The design remains uncluttered, focusing on the interplay between lettering and gilding.
Materials
- Handmade 100% cotton rag paper, 11 x 14 in (28 x 35.5 cm), acid-free and archival
- Acid-free black calligraphy ink, water-based
- Fine sable or synthetic brush (size 2 or 3) for precise lettering
- Brush-on gold leaf adhesive sizing, non-toxic and water-based
- Gold leaf sheets (loose, non-toxic imitation or genuine gold)
- Soft gilding brush (squirrel, goat, or synthetic hair), clean and dry
- Palette or mixing tray for ink and sizing
- Ruler and hard pencil (2H or harder) for layout guidelines
- Blotting paper to absorb excess moisture
- Small clean water container for brush cleaning
Alternatives: Use synthetic brushes if preferred. Imitation gold leaf (composition metal) is suitable for most decorative uses and is beginner-friendly.
Time, Skill, and Workspace
- Estimated time: 4–6 hours, including drying periods for ink and adhesive
- Skill level: Intermediate—requires steady hand and some brush lettering experience
- Workspace: Use a clean, well-lit area with good ventilation. Prepare a dust-free surface for gilding, and keep all tools and materials organized and within reach. Avoid drafts during gold leaf application.
Process Overview
- Cut handmade cotton rag paper to 11 x 14 in (28 x 35.5 cm), ensuring a flat, blank surface
- Draw light pencil guidelines and letter the chosen phrase in black ink, allowing it to dry
- Apply gold leaf adhesive sizing with a fine brush to selected areas of the lettering
- Carefully place gold leaf flakes onto the tacky adhesive and gently brush away excess
- Present the finished artwork: crisp black calligraphy accented with bright gold leaf on textured cream paper
Step-by-Step Instructions
- Prepare your workspace. Cover your work surface with a clean, lint-free cloth or paper. Arrange all tools and materials within easy reach. Wash hands thoroughly to avoid transferring oils to the paper or gold leaf.
- Cut and inspect the paper. If needed, trim the handmade cotton rag paper to 11 x 14 inches (28 x 35.5 cm). Choose the smoother or most attractive side for your artwork.
- Flatten the paper if necessary. If the paper is curled, press it between blotting paper and heavy books for 30–60 minutes before starting.
- Draw light pencil guidelines. Using a ruler and hard pencil, lightly mark horizontal guidelines for your calligraphy, including the baseline and x-height. Keep marks faint for easy erasure.
- Plan your layout. On a scrap sheet, sketch your word or phrase and decide which strokes or flourishes will be gilded. Choose the appropriate brush size and finalize your composition.
- Prepare your ink and brush. Pour a small amount of black ink into a palette. Dip your brush, blot off excess, and test strokes on scrap paper to ensure smooth ink flow.
- Letter your calligraphy. Using steady, confident strokes, write your phrase on the prepared paper, following the guidelines. Avoid overworking any area to prevent feathering.
- Let the ink dry completely. Allow the calligraphy to air dry for at least 30–60 minutes. Avoid using heat sources that could warp the paper.
- Erase pencil marks. Once the ink is dry, gently erase any visible pencil lines with a soft eraser, supporting the paper to prevent creasing.
- Apply adhesive sizing. With a fine brush, paint a thin, even layer of gold leaf adhesive sizing onto the areas you wish to gild. Use a light touch to prevent the adhesive from bleeding beyond the intended zones.
- Wait for tackiness. Allow the adhesive to become tacky, usually 15–30 minutes. Test by gently touching with the back of a brush; it should feel sticky but not wet.
- Apply gold leaf. Using a soft gilding brush, pick up small pieces of gold leaf and gently lay them over the tacky adhesive. Do not press; let the leaf settle naturally.
- Secure the gold leaf. Once all adhesive areas are covered, softly tamp down the gold leaf with the dry gilding brush to ensure full contact.
- Remove excess leaf. After a few minutes, gently sweep away loose flakes with the gilding brush in light, circular motions, taking care not to disturb the ink or paper.
- Touch up as needed. Inspect the gilded areas. If any spots are missed, reapply sizing, wait for tack, and repeat the gilding process. Let the finished piece rest undisturbed for at least one hour to ensure adhesion.
- Optional: Burnish for shine. When the gold leaf is fully dry, gently buff the gilded areas with a clean, soft cotton cloth to enhance brilliance. Test on a small area first.
Visual Checkpoints
- After paper preparation: Flat, cut sheet of handmade cotton rag paper with visible texture and deckled edges
- After calligraphy: Smooth black lettering on the paper, following faint pencil guidelines, with no ink smudges
- After erasing guidelines: Clean calligraphy with no visible pencil marks
- After gilding: Gold leaf flakes adhering to selected letter areas, with some excess leaf present
- After finishing: Crisp black calligraphy accented by bright, clean gold leaf, with a flat and undamaged paper surface
Tips for Success
- Test adhesive and gold leaf application on a scrap piece of the same paper before starting the final artwork
- Work in a low-dust, draft-free environment to prevent gold leaf from drifting
- Use tweezers or a static-free brush to handle gold leaf flakes, minimizing direct contact
- Vary the width of gilded strokes or add subtle gold accents for visual interest
- Cover finished sections with clean paper as you work on adjacent areas to protect them
Common Issues and Solutions
- Ink bleeding: Use less ink and a lighter touch. Switch to a drier brush or test a different ink/paper combination if needed.
- Gold leaf not sticking: Ensure the adhesive is tacky, not wet or dry. Reapply sizing and wait for proper tack before applying gold leaf again.
- Paper buckling: Avoid excess moisture. If buckling occurs, press the dried artwork between blotting paper and books to flatten.
- Gold leaf outside intended areas: Gently remove stray flakes with a clean, dry brush. For persistent spots, carefully lift with a soft eraser or a small piece of tape.
- Smudged ink: Allow ink to dry fully before erasing or applying sizing. If smudging occurs, let it dry, then touch up with a fine brush and matching ink.
Safety Guidelines
- Use only non-toxic, water-based adhesives and inks in a well-ventilated space
- Keep gold leaf and adhesive away from eyes and mouth; wash hands after use
- Dispose of gold leaf scraps and blotting materials safely, keeping them away from children and pets
- Store all materials in labeled containers, out of reach of children
Finishing and Display
- Let the finished piece cure for 24 hours before framing or handling extensively
- Frame under glass with acid-free matting to protect the gold leaf and paper
- Avoid touching gold leaf with bare hands, as oils can dull its shine
- Display away from direct sunlight to prevent fading and deterioration
- For portfolio storage, use acid-free sleeves and keep the artwork flat in a cool, dry place
Cleanup and Storage
- Rinse brushes thoroughly with water immediately after use, especially after using adhesive sizing
- Wipe palettes and containers with a damp cloth before ink or sizing dries
- Store unused gold leaf in its original booklet or a sealed envelope
- Keep leftover paper and blotting sheets flat and dry for future projects
- Dispose of used blotting paper and gold leaf scraps according to studio waste guidelines
Variations to Explore
- Try colored inks or watercolors for the calligraphy, pairing with silver or copper leaf for different effects
- Experiment with alternative paper sizes or shapes, such as square or panoramic formats
- Apply gold leaf to abstract flourishes, borders, or backgrounds for a modern look
- Layer multiple sheets of handmade paper for a dimensional effect
- Combine gilding with embossing or deckled edge tearing for added texture